Linux For Home

Linux For The Home PC - 4683

Thursday, February 20, 2014

Tutorial 5: Introduction to ls Command

ls command is used to list files and directories in current working directory.

Eg.

cat > test1
This is a test file.
ls


In the above set of commands we created a file called test1. Later, we executed ls command to see the list of files and directories in pwd.

ls command


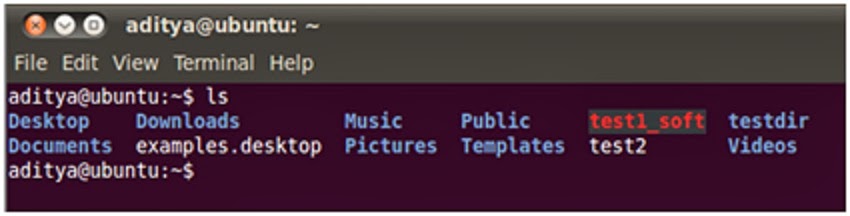
The above screenshot shows the output of ls command. We can see that it shows the list of files and directories. The names highlighted in blue are the names of folders while the ones in white are the files. The same can also be verified from the file browser.

ls command can also be used to view the files and folders in another directory.

Eg. ls Desktop

The above command will show the list of files and directories in Desktop folder. It is shown in the below screenshot.

Using ls in different folder


From above screenshot we can see that the Desktop folder has a file named Shell Scripting - In a Nutshell.docx

If we also want to see the files and permissions for the files and the folders then we can use ls command with -l.

Eg. ls -l

ls - l


You can see from the above screenshot that the first line of output shows "total 40".

This means that all the files and folders listed collectively occupy 40 blocks of memory (Each block of memory is 1024 bytes).

Moreover, you can observe that some of the listing the first column starts with d, while for some it starts with -. Please note that, whenever the first column starts with d, then it is a directory while, if the first column starts with - then it is a file.

Now, let us have a look at the permissions. The second, third and the fourth columns tell about the permissions to the owner, next three columns tell about the permissions to the group while the subsequent three columns tell about the permissions to other user.

For example, the Desktop has read, write and execute permissions for the owner, while only read and execute permissions for the group and other users.

Another important extension for ls is -a where 'a' stands for 'All'. When you use ls command with -a, it will show the list of all the files and folders including those which are hidden.

Eg.

ls - a


As seen in the above screenshot, ls -a displayed the list of all the files and folders in present working directory including those which are hidden. Here, all the files and folders starting with . denote hidden.

ls command can be used with many more options however, above two are the most widely used options. As we move further in the tutorial, we will see some more.

Saturday, February 15, 2014

Tutorial 4: Understanding File Permissions and umask

Every file or a folder that we create in unix has a set of permissions for the file owner, group owner and the other users. Let us have a look at these permissions.

Eg. touch test1.

Here we created a new empty file called test1.

Now locate the file in the present working directory and right click on it. Then, click on properties and open the permissions tab as below.


From above screen shot we can see that by default the owner of the file gets Read and Write permissions, while the group users and other users have Read permissions only. Moreover, it can be observed that there is a checkbox for Execute which is unchecked by default. Checking this, makes the file executable. This comes handy especially when your file holds a shell script and you want to execute it on terminal.

Read permission allows user only to read the contents of a file.
Read and write permission allows user to read the contents of a file and add or edit the contents of a file.
Execute permission allows user to execute the file on a terminal.

Please note that whenever a file is created, the above set of permissions would be set by default unless you explicitly mention a different set of permissions while creating a file.

It is interesting to know that each of these permissions have a numeric value associated with it.

Eg.
Read - 4
Write - 2
Execute - 1

This means, when the file has the read, write as well as execute permission, then it has a numeric value as 4+2+1 = 7. However, with default settings the file will always have a value of 6 i.e. it will have read and write permission.

Having said that, let me introduce you to a system variable called umask.

umask - It is a system variable.
When we write umask on terminal and press enter, we get output as 0022.


The first 0 tells that it is an octal number and the remaining three digits 022 are responsible for the default permissions assigned to a file or a folder. For example, for setting the default permission of a file, unix substracts 022 from 666. This gives the output as 644. This means, the owner of file will have read and write permissions (4 for read and 2 for write) while the group members and other users will only have read permission (4 for read).


We will elaborate these concepts further when we look into chmod command to change the file permissions. 

Thursday, February 13, 2014

Tutorial 3: Copy files, Hard Links and Soft Links

13. cp - cp command is used to copy the file from one location to another.

Eg. touch test1
cp test1 testdir/test2


The above set of commands will first create an empty file called test1. Then the file would be copied in another folder testdir and would be saved with name test2.


we can see the files below:


The above screen print shows the touch command creating test1 file.


The above screen shot shows the copy of test1 in testdir folder and named as test2.

Please note that cp command is different from mv. If you use mv instead of cp, a new file will not be created but rather the file would be moved from one location to another.

14. ln - ln command is used to create links to a file. Links can be of two types , soft link and hard link.
Lets create a hard link.

Eg.


In the above example we created an empty file called test1. Then we created a hard link to test1 as test2 using ln command. When we checked to contents of test1 and test2, both the files were empty. Then we added some text to test1 and verified it using cat command. Later we verified the contents of test2 using cat command. Note that the contents of test1 are also replicated in test2. Note that, test2 is not the actual file and hence will always have the size as 0 bytes as shown below.


In order to create soft links, we can use ln command with -s.

Eg. ln -s test1 test1_soft

This will create a soft link named test1_soft for test1 file. It is shown below:


Now, if the original file test1 is deleted, the contents of the hard link test2 will still remain but the soft link test1_soft will become unusable.


In above screenshot, test1 file is deleted however, a hard link test2 and soft link test1_soft are still present.
If you try to see the data in a hard link, it is still available.


However, when you try to see data in soft link, then  error appears.


Saturday, February 8, 2014

Tutorial 2 - Playing With Files and Directories

In this tutorial, lets have a look at some commands to play around with the files and directories.

6. touch - This command is used to create empty text files. You can also create multiple files in a single command.
Eg. touch test1

touch test2 test3


From the above result set it is clear that touch command created a file called test1 in the present working directory.
*** ls is used to list the files in directory. This would be discussed later.

7. mkdir - This command is used to create a folder in present working directory.

Eg. mkdir Test1
It will create a folder Test1 in the present working directory.
If you want to create the folder at any other location then you have to specify the path accordingly.
Eg. mkdir Documents/Test2
This command will create a Test2 folder in Documents folder.

8. cd - cd command is used to change the directory.
Eg. cd Test1
It will change the present working directory to home/Aditya/Test1

9. cat - cat command can be used to create a test file and add content to it. Also, it can be used to read the contents of an already existing text file. However, you have to use the > and  < operators to use this command.
Eg. cat > test1


When cat command is used with a greater than symbol followed by a file name, it allows you to add the contents to that file. As displayed in above example, we added the content to file test1. In order to save the content and get back to $ prompt, you have to use the keyword combination Ctrl+D.
In order to read the contents of a file you have to use < sign.

Eg. cat < test1
cat command can also be used to merge the contents of two files.

Eg. cat > test1
This is test1.
cat > test2
This is test2.
cat test1 test2 > test3


10. mv - mv command is used to rename a file or a folder.

Eg. mv test newtest
The above command renames a file called test with a new name called newtest.


You can see from the above screenshot that the file called test has been renamed as newtest.

11. rm - rm command is used to remove the files or directories.

Eg. rm test1


In above example, rm removes a file called test1.
However, in order to remove a directory we have to use rm with -r.

Eg. rm -r testdir


In above example we created a directory called testdir and tried removing is with rm without using -r. we got an error message. Later we tried to remove the same directory using rm with -r, then we successfully removed testdir.

12. rmdir - This works same as that of rm -r.

Eg. rmdir testdir


As seen above rmdir and rm -r produces same result.

Friday, February 7, 2014

Tutorial 1: Introduction and some basic commands


Shell scripting is one of the easiest programming languages to learn. It is very useful as you can use it to automate your tasks that otherwise would take long time to perform. In this tutorial, we will start from the easier commands and will move to more complex programs.

Shell: It is an interface between the user and the UNIX Kernel.
This means that the user gives the command to shell which in turn converts the command to a form that can be understood by Kernel.

Kernel: It is a program that manages the system resources.

How to access shell:
Shell can be accessed via a terminal. Terminal is the Unix command prompt that can be accessed from "Applications".
Note: All Unix commands are to be typed in lower case. Else, the commands would not be recognized.

Basic Commands:

1. clear - Clears the screen.

2. who am i - Displays the user name, terminal id and the date and time when the user logged in.

Eg. aditya             pts/0     2014-02-04 19:44

Here aditya is the user name. pts/0 is the terminal id and remaining portion shows the date and time.

3. pwd - It tells the user about present working directory.
Eg. /home/Aditya

4. cal - This command is used to display the calendar of current month, with current date highlighted.
cal command can be enhanced to display the calendar for past and future months.
Eg. cal 3 1983
Above command will display the calendar for March 1983.
The above command can also be used with month name instead of number.
Eg. cal mar 1983 will produce the same result as the previous one.

5. date - This command tells us the day, month, date, year and the time.


This command can also be customized to show the date as per our preference.
Eg. date '+DATE:%m-%y%nTIME:%H:%M:%S'


The above result set shows the month and the year. Then, on the next line it shows time i.e hrs, mins and sec.
Let us examine the extension of the command that we used to customize the actual command.
The extension is enclosed in single quotes.
+ denotes that we are adding an extension to the command.
DATE: is the text to denote the date.
%m denotes month.
- is used as separator.
%y denotes year.
%n denotes new line.
TIME: is the text to denote time.
%H denotes hrs.
: is a separator.
%M denotes mins.
%S denotes seconds.

In next tutorial we will come up with some more interesting commands.